A Deep Dive into Python's Tokenizer
September 18, 2019
Python’s reference implementation, CPython, makes a concerted effort to minimize complexity. While this has some consequences around performance of the language and short-term feature development, it means that CPython’s source code is surprisingly approachable for a language of its size and stature.
By pulling apart tokenization, the first stage in the execution of any Python program, I hope to show just how approachable CPython’s internals are.
The Tokenizer
The job of a tokenizer, lexer, or scanner is to convert a stream of characters or bytes into a stream of words, or “tokens”.
Some compilers don’t explicitly separate the processes of tokenization and parsing. Certain parsers are capable of implicitly forming tokens themselves. Python uses the separation of these two stages to its advantage, both to simplify the parser, and to apply a few “lexer hacks”, which we’ll discuss later.
While it’s undocumented and unsupported, CPython exports its internal
C-based tokenizer API. This is the same tokenizer used to parse Python
source code prior to execution. The complete implementation lives in Parser/tokenizer.c.
Using the C-Based Tokenizer
Let’s start by making sure we have CPython’s development headers installed on our machine. Some operating systems or distributions may install this by default, but on Debian and Ubuntu, we have to install a separate package.
$ apt install python3-devOnce that’s done, we can cross-reference Parser/tokenizer.h
to find the functions we care about, and call them.
#include <stdio.h>
#include <Python.h>
#include <token.h>

typedef void tok_state_t;

// We need to declare these ourselves since they're undocumented and CPython
// doesn't expose any header files with their signatures.
extern tok_state_t *PyTokenizer_FromFile(FILE *, const char*, const char *,
                                         const char *);
extern void PyTokenizer_Free(tok_state_t *);
extern int PyTokenizer_Get(tok_state_t *, char **, char **);

// This is a toy. Don't use this in production environments.
int main() {
    tok_state_t *tok = PyTokenizer_FromFile(stdin, NULL, NULL, NULL);
    char *start, *end;

    // Fetch each token and print out its type.
    while (1) {
        int tok_type = PyTokenizer_Get(tok, &start, &end);
        printf("%s\n", _PyParser_TokenNames[tok_type]);
        if (tok_type == ENDMARKER) {
            break;
        }
    }

    PyTokenizer_Free(tok);
}
We can compile this with gcc or clang. I’m using
pkg-config in this example to generate the flags needed for
my c compiler.
$ cc $(pkg-config --cflags --libs python3) main.c -o pytokenizeOnce that’s done, we’re left with a pytokenize binary
that will accept source code on stdin, and will print a sequence of
token types to stdout. 1
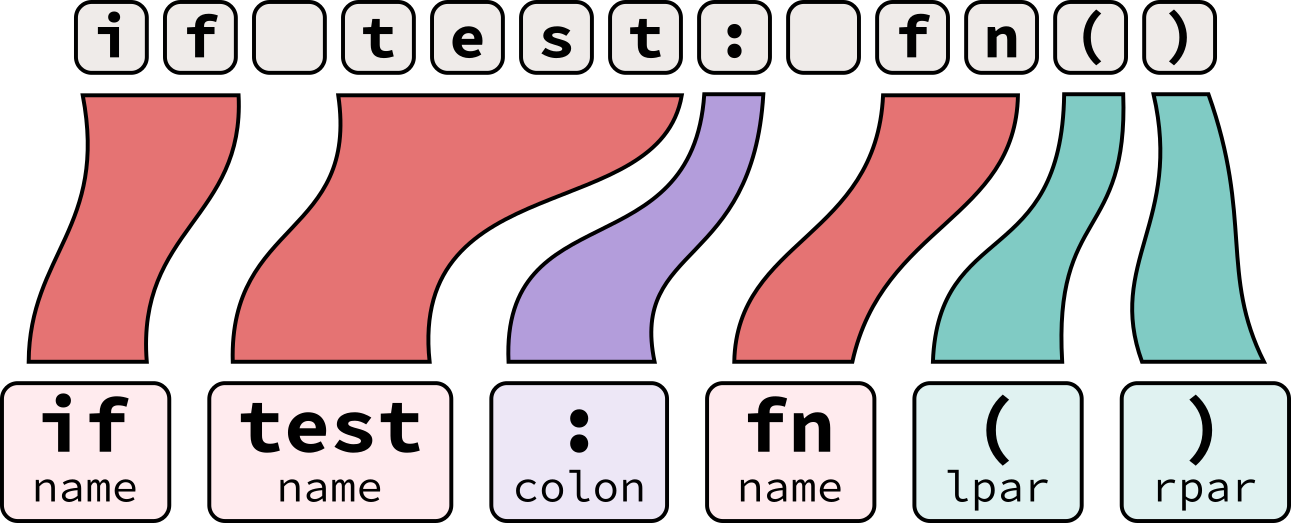
$ ./pytokenize <<< 'if test: fn() # comment'NAME
NAME
COLON
NAME
LPAR
RPAR
NEWLINE
ENDMARKERYou’ll notice that this tokenizer drops comments2 and whitespace. Neither of these artifacts matter to the execution of the program, so discarding them now will make the later step of parsing easier.
Stepping Through The Source
The tokenizer’s central function function, tok_get
fetches a single token, and advances the tokenizer’s position to the end
of that token. It’s implemented as a state machine written with a series
of conditionals and gotos.
The function takes the current state and returns a token type
(represented with an int). It also takes two pointers which
it will update to point to the start and end positions of the current
token.
static int
tok_get(struct tok_state *tok, char **p_start, char **p_end)
{
A variable, “c”, is declared. This will store our
current byte. tok_get processes a single UTF-8 byte at a
time, but an int is used here instead of a single-byte
unsigned char so that it can optionally store a sentinel
EOF (end of file) value encoded as -1.
    int c;
    /* ... */
Before attempting to find tokens, tok_get first strips
out whitespace and comments until the first tokenizable character is
found.
    tok->start = NULL;
    /* Skip spaces */
    do {
        c = tok_nextc(tok);
    } while (c == ' ' || c == '\t' || c == '\014');

    /* Set start of current token */
    tok->start = tok->cur - 1;

    /* Skip comment */
    if (c == '#') {
        while (c != EOF && c != '\n') {
            c = tok_nextc(tok);
        }
    }

    /* ... */
This is followed by a series of top-level conditional statements
where the next character, c, is tested to guess the next
type of token that needs to be produced.
The order of these conditionals roughly matches the frequency of each token type in a normal piece of source code, reducing the average number of branches that need to be evaluated. Since identifiers (names) are the most common type of token, that test comes first.
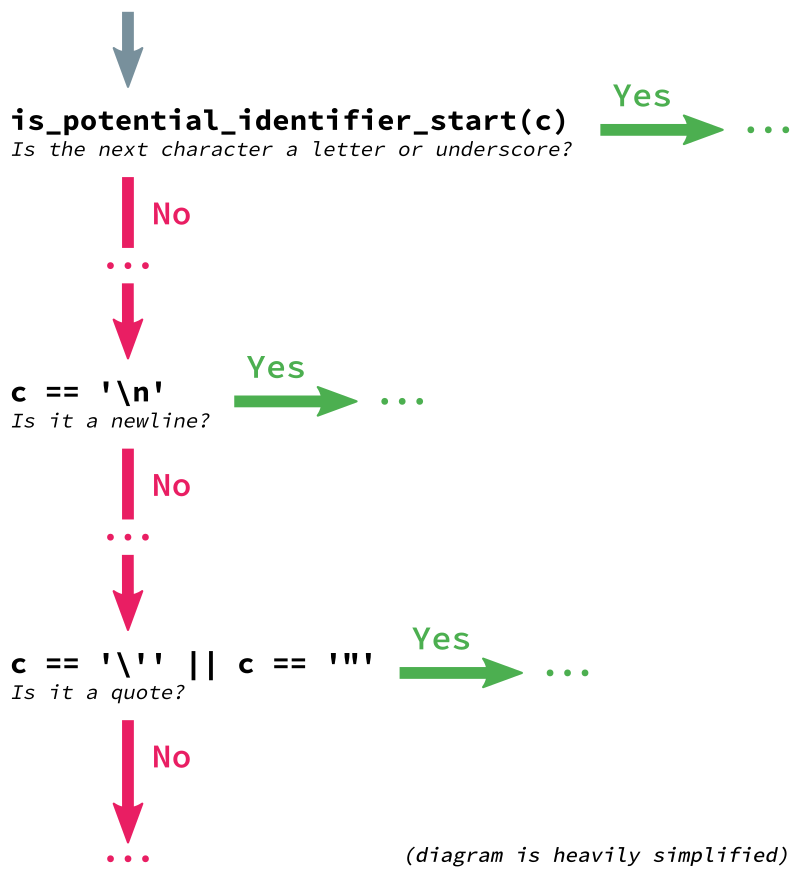
    if (is_potential_identifier_start(c)) {
        /* ... */
    }
    /* ... */
    if (c == '\n') {
        /* ... */
    }
    /* ... */
    if (c == '\'' || c == '"') {
        /* ... */
    }
However, a single character isn’t always enough to determine the type
of a token. Let’s process the byte-string b"abc".
The first character, b, is a valid starting character
for an identifier, so we optimistically expect an identifier and take
the first branch. Once we encounter the second character, a quote, we
realize that b"abc" is actually a byte-string, and we must
jump to the string handling logic, breaking out of the identifier
processing block.
That gives us a state machine that looks something like this (zoomed in version):
These jumps between conditional blocks are implemented with
gotos. While goto statements are often frowned
upon, they’re perfect for representing a state machine, and their use
makes the code easier to follow.
    if (is_potential_identifier_start(c)) {
        /* ... */
        while (1) {
            /* ... */
            c = tok_nextc(tok);
            if (c == '"' || c == '\'') {
                goto letter_quote;
            }
        }
        return NAME;
    }
    /* ... */

  letter_quote:
    /* String */
    if (c == '\'' || c == '"') {
        /* ... */
        return STRING;
    }
For convenience, tok_get is wrapped in PyTokenizer_Get,
which we saw earlier in our usage example.
int
PyTokenizer_Get(struct tok_state *tok, char **p_start, char **p_end)
{
    int result = tok_get(tok, p_start, p_end);
    if (tok->decoding_erred) {
        result = ERRORTOKEN;
        tok->done = E_DECODE;
    }
    return result;
}
PyTokenizer_Get is then called in a loop until every
token in the file is extracted.
A Pure-Python Tokenizer
Reading the C implementation is useful for understanding how CPython works, but because it’s undocumented, unsupported, and only accessible through a C API, it’s impractical for most real-world uses.
Fortunately, Python’s standard library contains a pure-Python
reimplementation of the C-based tokenize.
Its
source code may be an easier read, since it replaces some of the C
code’s state management with regular expressions.
We can run this tokenizer over our example from earlier:
$ python3 -m tokenize --exact <<< 'if test: fn() # comment'1,0-1,2: NAME 'if'
1,3-1,7: NAME 'test'
1,7-1,8: COLON ':'
1,9-1,11: NAME 'fn'
1,11-1,12: LPAR '('
1,12-1,13: RPAR ')'
1,15-1,24: COMMENT '# comment'
1,24-1,25: NEWLINE '\n'
2,0-2,0: ENDMARKER ''You may notice that while it still excludes whitespace, this
tokenizer emits COMMENT tokens. The pure-Python
tokenize module aims to be useful as a standalone library,
whereas the internal tokenizer.c implementation is only
designed to track the semantic details of code.
Tools that read information from comments will sometimes use the
pure-Python tokenize module to fetch those comments. For
example, Flake8
uses it to find “# noqa” comments, which tells Flake8
to ignore errors found on those lines.
Token-Based Refactoring
The tokenize module has a cool trick up it’s sleeve: untokenize.
This hidden gem can enable simple refactoring operations. Let’s say that
we wanted to rename old_function to
new_function. We just need to extract all of the
NAME tokens and modify them before calling
untokenize.
from io import BytesIO
from tokenize import NAME, tokenize, untokenize

example_program = """
def old_function():  # should be updated to `new_function`
    ...

def another_old_function():  # should not get touched
    ...

old_function()  # should be updated to `new_function`
another_old_function()  # should not get touched
"""

old_tokens = tokenize(BytesIO(example_program.encode("utf-8")).readline)
new_tokens = []
for tok in old_tokens:
    if tok.type == NAME and tok.string == "old_function":
        new_tokens.append(tok._replace(string="new_function"))
    else:
        new_tokens.append(tok)

print(untokenize(new_tokens).decode("utf-8"))
Running this code gives us the updated program:
def new_function():  # should be updated to `new_function`
    ...

def another_old_function():  # should not get touched
    ...

new_function()  # should be updated to `new_function`
another_old_function()  # should not get touched
This is safer than a basic textual find-replace operation, because it
won’t accidentally touch strings, comments, or other identifiers with
old_function in their name, like
another_old_function.
However, because the token stream is low-level, and it’s hard to derive a proper understanding of a program’s meaning from it, more serious refactoring operations should be left to higher-level libraries, such as LibCST, Bowler, or RedBaron. You can read more about LibCST on the Instagram Engineering blog.
Tokenizer Hacks
I mentioned earlier that CPython uses the separation of tokenization and parsing to it’s advantage to simplify the parser. This is evident in some of CPython’s tokenizer “hacks”.
Indent/Dedent Tokens
The first thing new developers tend to notice about Python is its indentation-sensitive syntax. While most languages use explicit markers (usually curly braces) to denote the beginning and end of a logical block, Python infers it from indentation.
This simple act transforms Python’s grammar from “context-free”, which is relatively easy and fast to parse, to one that is “context-sensitive”. However, CPython uses an LL(1) parser, a context-free parsing algorithm. What gives?
CPython moves the complexity of managing the indentation’s context
out of the parser and into the tokenizer, where the separation of
concerns allows it to be handled much more easily. If we take a program
with indentation and process it with the tokenizer module,
we can see that it emits fake INDENT and
DEDENT tokens.
$ python3 -m tokenize --exact <<EOF
if test:
    fn()
EOF
1,0-1,2: NAME 'if'
1,3-1,7: NAME 'test'
1,7-1,8: COLON ':'
1,8-1,9: NEWLINE '\n'
2,0-2,4: INDENT ' '
2,4-2,6: NAME 'fn'
2,6-2,7: LPAR '('
2,7-2,8: RPAR ')'
2,8-2,9: NEWLINE '\n'
3,0-3,0: DEDENT ''
3,0-3,0: ENDMARKER ''The tokenizer implements this by pushing and popping indentation
levels onto and off of a stack. The top of the stack
(indents[-1]) always represents the current indentation
level. We can see this in tokenize.py’s
implementation:
if column > indents[-1]:           # count indents or dedents
    indents.append(column)
    yield TokenInfo(INDENT, line[:pos], (lnum, 0), (lnum, pos), line)

while column < indents[-1]:
    ...
    indents = indents[:-1]
    yield TokenInfo(DEDENT, '', (lnum, pos), (lnum, pos), line)
Because indentation is only pertinent to statements, and not to
expressions, this behavior is disabled inside of parentheses. The
opening and closing parenthesis are tracked by incrementing and
decrementing a simple counter. When the counter is non-zero, indentation
is not tracked and INDENT and DEDENT tokens
are omitted.
async and await
Python 3.5 introduced async and
await keywords:
async def read_data(db):
    data = await db.fetch('SELECT ...')
    ...
This created a compatibility problem. Existing code could use
async and await as variable names, but an
identifier can’t be both a keyword and a variable name. For example,
while this code clearly uses async and await
as variable names:
async = db.fetch('SELECT ...')
await = async.run()
This code is ambiguous:
await(db.fetch('SELECT ...'))It’s not possible to tell if await should be function
call, or a keyword.
This was mitigated with a tokenizer hack. await is only
recognized as a keyword inside of an async function, and
async is only recognized as a keyword when immediately in
front of def.
This requires the tokenizer to be able to look
ahead a single token for def when async is
encountered. It also requires tracking indentation to determine when a
function starts and ends, but that’s not a problem, since the tokenizer
already special-cases indentation.
Because async wasn’t valid in front of a
def keyword in older releases of Python, this change was
perfectly backwards compatible.
Let’s tokenize an example that uses async and
await:
$ python3.6 -m tokenize <<< 'async def fn(): await value'1,0-1,5: ASYNC 'async'
1,6-1,9: NAME 'def'
1,10-1,12: NAME 'fn'
1,12-1,13: OP '('
1,13-1,14: OP ')'
1,14-1,15: OP ':'
1,16-1,21: AWAIT 'await'
1,22-1,27: NAME 'value'
1,27-1,28: NEWLINE '\n'
2,0-2,0: ENDMARKER ''You’ll notice that async and await generate
corresponding ASYNC and AWAIT tokens.
Let’s try a different example where async and
await aren’t used inside of an async function:
$ python3.6 -m tokenize <<< 'await = async.run()'1,0-1,5: NAME 'await'
1,6-1,7: OP '='
1,8-1,13: NAME 'async'
1,13-1,14: OP '.'
1,14-1,17: NAME 'run'
1,17-1,18: OP '('
1,18-1,19: OP ')'
1,19-1,20: NEWLINE '\n'
2,0-2,0: ENDMARKER ''Here, async and await just generate normal
NAME nodes!
We ran these examples with Python 3.6. This hack was removed in
Python 3.7, where async and await are always
treated as keywords. This breaks backwards compatibility, but it also
allows async and await to be used in more
places, such as async
generators inside synchronous functions.
Python 3.8 adds back some of the code needed to support
async and await as keywords, but only when a special
feature_version flag is passed to the ast
module. This enables tools (such as linters and type-checkers)
running on Python 3.8 to inspect code written for an older Python
release.
Honorable Mentions: Other Tokenizers
We already mentioned two tokenizers in Python’s reference implementation, but it turns out that there’s a third. The undocumented but popular lib2to3 library uses a fork on the pure-Python tokenizer we saw earlier.
This tokenizer generates tokens objects in a slightly different format, and is designed to support Python 2 syntax in addition to some Python 3 syntax. lib2to3’s tokenizer isn’t as well supported as the standard library’s tokenizer, so unless you need to work with Python 2 or lib2to3, you should steer clear of it.
Outside of CPython, there’s a ton of different tokenizers, many of which are forks of each other. Here’s just a small selection of interesting Python tokenizers:
- PyPy uses a tokenizer written in RPython (a fast subset of Python compiled to C).
- Black and Parso both use forks of lib2to3, and contain forks of lib2to3’s tokenizer. However, both make substantial improvements to the original tokenizer.
- Baron uses a unique regular-expression-heavy
tokenizer. Instead of generating
INDENTandDEDENTtokens inside the tokenizer, it instead generates them using a separate post-processing pass.
What’s Next?
The tokenizer is just the first in a series of steps. Like the tokenizer, each step in this process is designed to iteratively simplify the daunting problem of program execution.
Now that our source code has been converted to a sequence of tokens, CPython can use that to form a parse tree which will eventually be transformed into a similar but higher-level abstract syntax tree. The parse tree is generated using an LL(1) parsing algorithm that forms the basis of another state machine.
A symbol table is generated by stepping through the abstract syntax tree. The symbol table step handles the logic required for dealing with scopes, tracking where a given local variable name is stored.
The abstract syntax tree and symbol table then serve as input to a compiler that generates a sequence of bytecode instructions that can be executed inside of CPython’s virtual machine.
If you’re unfamiliar with the
<<<syntax used here, that’s because it’s a here string. The examples in this post make heavy use them along with here documents. Here strings make it easy to provide input to a process’s stdin.↩︎If you’re using Python 3.8 (or a later release), it’s possible to configure the tokenizer and parser to retain type comments. This feature makes it easier for static type checkers like mypy to re-use CPython’s parser.↩︎
The views expressed on this site are my own and do not reflect those of my employer.